
How to conduct conversations-based audio journalism projects

From problem solving set-ups to streamlining your editing, here are our lessons learned
Conversations-based journalism is a source-driven model that empowers people to share their own stories of how their lives are impacted by news events and systemic forces. This has been a focus of much of KBIA’s work for the past six or so years, which started with Missouri Health Talks, a project I began in 2017 that focuses on health and access.
For these projects, producers go into the field with a mobile studio audio kit and gather audio from participants. The sources choose what they would like to talk about with minimal guidance, but a broad list of “possible conversation starter” prompts provided. The final audio pieces do not include the producer’s voice.
For Missouri on Mic, we worked with dozens of Missouri School of Journalism students over the course of a year. The students helped plan recording events, worked with transcripts, and edited the final on-air audio. We gathered the voices of Missourians at 16 different locations throughout the state during the same time frame.
With our project, we had three goals — to increase the diversity of voices represented by the project, to make the project reproducible by people with different levels of audio experience, and to streamline the editorial process.
Pre-production and planning: Expand audience and target specific underrepresented communities
We wanted to use the model of conversations-based journalism to reach more specific communities who often go unheard by traditional media. This includes people of different races, abilities, genders and sexualities, geographic location and socioeconomic level.
To achieve this goal, we designed what we called “pop up” events. These events lasted for a shorter amount of time, could use a smaller team to achieve similar results, and used a simplified version of the mobile studios.
We believe there are numerous ways to approach this. One way is to have the communities lead the project themselves and take the journalism out of it. Another is arming reporters with the right language to approach media skeptical populations, and eliminating unease with communities by having them do more involved outreach before even scheduling the events.
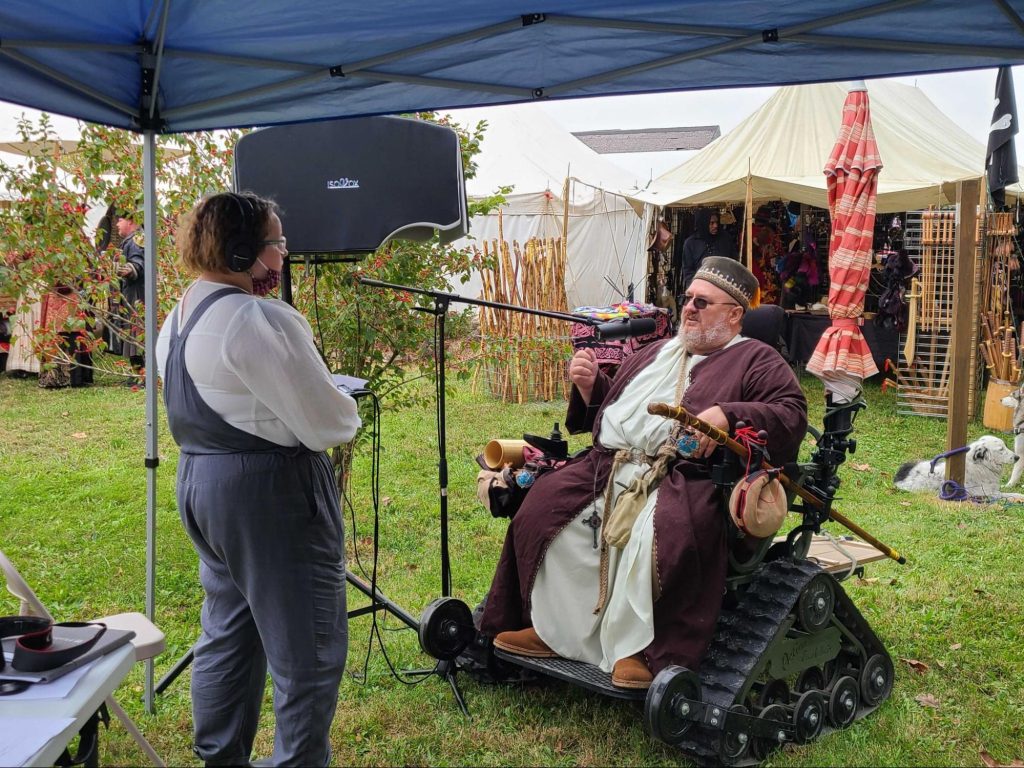
So, this task often ended up coming back to myself, Becky Smith, and associate producers Becca Newton and Caoilinn Goss. We ended up with lots of pop up events and locations: public libraries, a local Renaissance festival, a campus Diwali celebration, a local book festival, several rural communities around us, and, perhaps our favorite, Paquin Tower, which is housing for low-income and disabled Columbians.
We broke down connecting with a community/finding a community space for a reporting event into a few steps:
1. Identify the community and community leaders
Be sure to think beyond “newsworthy” places — think about where the community already gathers, especially the niche communities you want to engage with.
2. Send lots of emails. Don’t be shy
The worst people can say is “No,” and we found that often — they don’t. People have just never asked them to be hosts of a project like this before.
3. Explain the project thoroughly
When will you be there, how much space will the team need/take up, what do you need from them? Be clear and direct.
4. Be sure to ask people who else you should connect with
People in the community will know other good potential venues and how you can spread the word to the greater community. This can include local Facebook groups, emails to other potentially interested folks and even more targeted communities, the local paper, the local library and other locations the community already gathers within.
5. Confirm the day before the event and answer any last-minute questions people have
Your event/pop up is probably one of many things on people’s schedules, so be respectful of their time and commitments. Confirm details and be open to repeating information if needed.
Simplification and problem solving
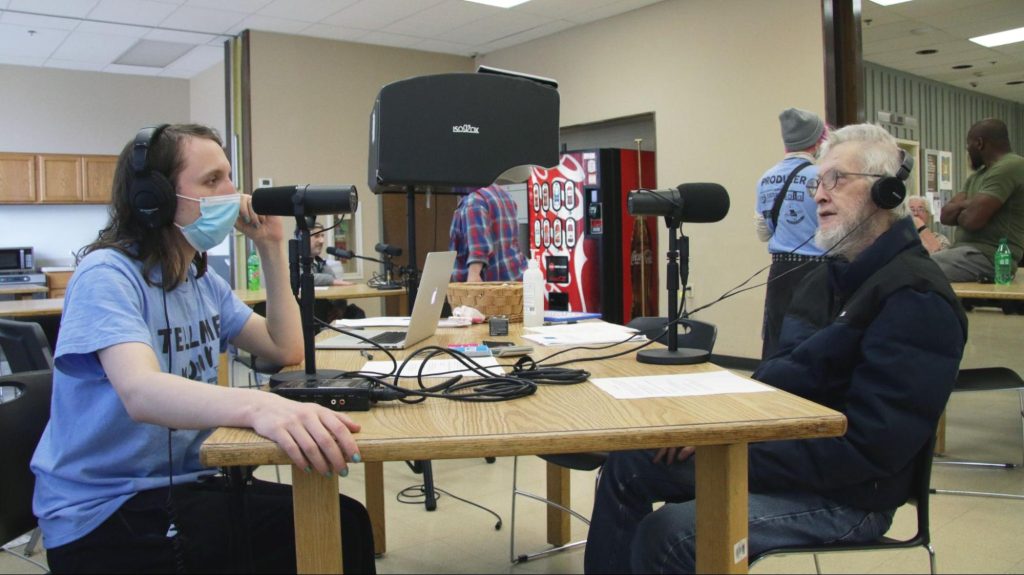
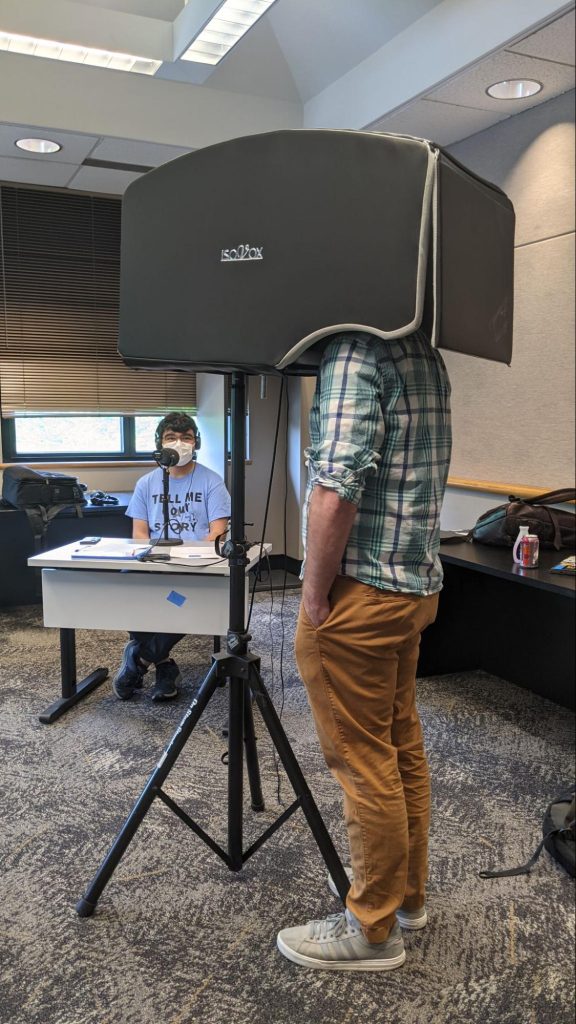
The original Missouri on Mic system included a soundboard, a system of color coded XLRs, four SM7B microphones, two standing audio booths, headphones, etc. But as we mentioned before, this system was complex and large. It often did not fit into a single vehicle, it required large and cumbersome boxes, and troubleshooting was difficult.
We wanted to simplify the system to ensure that producers with all levels of audio production experience could use it easily and record good sound. We also wanted to make sure that accessibility – for people with physical disabilities, children, people who simply can’t stand for long periods of time – was baked into the kit.
The biggest change that we made was moving our audio collection from the soundboard system to a mobile audio recorder/handheld audio recording (in this case a Marantz, but a Tascam or Zoom or similar recorder would work just as well). This is much more user friendly and has not resulted in any loss of audio quality. This system also allows for a few more redundancies; if one piece of equipment fails, having more than one mobile audio recorder, multiple SD cards, lots and lots of batteries, etc. ensures that the event can still be a success.
There is sometimes more background noise — especially in conversations from the “Open Air” kit, but as long as other environmental optimizations are done, we have not found this to be a detriment to the conversations. In fact, the controlled background noise sometimes adds to the conversation, like in the case of our Central Missouri Renaissance Fair audio where cannon bursts and fife playing can be heard. This controlled background noise allowed us, as producers, to put the audience more fully into the scene.
The only thing left to solve was how the producer and the source could both hear themselves during the conversation. After some research, we were able to find a simple and relatively cheap solution — a headphone splitter with a ¼ inch plug that fits directly into the recorder.
Accessibility
The standing audio booth allows the source to be isolated and surrounds their head with soundproofing materials that reduces background noise, which can be a boon. While this isolation can improve the audio quality, it also isolates the source and reduces the quality of conversation — they are speaking into a dark void rather than with a person.
The human connection of physically sitting down with a source, looking at them, and being able to react to them improves both the source’s comfort level and the overall depth of the conversation.
This was part of the reason that we moved the system to only one standing audio booth. The other reason for this change was accessibility. Standing booths are very tall and cannot be shortened to a height that works for children, people who use wheelchairs or those who can’t stand for long periods of time and may need to sit. This accessibility — as well as participant comfort — was one of the biggest reasons we moved to a hybrid system with one standing booth and one tabletop, open air kit.
One other note on accessibility we discovered was the need for an open air, tabletop kit for those who are deaf, hard of hearing and/or use hearing aids. We had a KBIA peer who belongs to that community test out the standing audio booth and she was unable to hear the producer clearly enough to make this work. Being able to physically see the producer, read lips, and/or have an ASL interpreter is an important aspect of making this project even more accessible and wide-reaching in the future.
The open air booth’s comparative informality also builds trust by putting the source and the interviewer on the same level, both literally and figuratively, and by allowing the conversation to be less one way. We make a point to ask participants if they have any questions for us, too. We felt this was important to make the experience less transactional, and facilitated that transparency and humanization of media folks that was core to the project’s mission.
Equipment breakdown of the modified Missouri on Mic kits
“Open Air” Kit
- Marantz recorder
- Two SM7B microphones
- Two telescopic table mic stands
- Three XLR cords, various sizes (10 ft, 16 ft, etc.)
- Two pairs of over-the-ear headphones, any brand
- Headphone splitter with a ¼ plug
- SD card*
- Folding table
- Two chairs
“Closed Audio Booth” Kit (also — the physically accessible kit)
- Standing audio booth
- Floor mic stand**
- Marantz recorder
- Two SM7B microphones
- Three XLR cords, various sizes (10 ft, 16 ft, etc.)
- Two to three over-the-ear headphones, any brand
- Headphone splitter with a ¼ plug
- SD card
- A chair
Other miscellaneous equipment needs
- Mic sanitizer
- Clorox wipes or equivalent
- A camera for photos
- A small white board with marker (for photo labeling***)
- Batteries — LOTS of AA batteries for the recorders
- Waivers
- Pens
- Extra headphones and microphones
- Small light sources for inside the standing sound booth
Practice makes professional
Producer comfort and familiarity is really important — if not essential — to the success of any kit being used. This was also a learning opportunity for me. We wrongly assumed each of the Missouri School of Journalism students would be comfortable with the kits when heading into the field.
Thanks to gracious feedback, we tried to always schedule one practice before each event. Basically, it explained how the systems were put together and showed the different pieces of equipment, and then we worked with teams to troubleshoot issues as they arose — in a newsroom practice setting.
Another big step is ensuring that they know how to conduct this type of interview. I found that some student producers added to the standardized list of questions, which could produce somewhat stilted conversations that lacked the level of reflection and vulnerability of more seasoned producers. Teaching these students to ask follow up questions and to share some of themselves in return was one hurdle.
But building trust also requires letting the source be the expert. After all, it’s their story, not ours. The best producers are able to ease participants in, get them comfortable sharing and grounded in a memory, and then step back and let the source shine. Sort of a step up, step back model, or as we like to say, “Show up, then shut up.”
We think more practice before heading into the field would be a benefit to the project. This way, the managing producers do not have to be at every single event for the entirety of the event. This gives the other in-field producers more agency, makes them more confident in the field and reduces overall stress for the producers and the participants. It can also greatly expand the scope of the project, allowing producers to be at multiple events, or locations within an event.
Preparing for the environment
The last component of high quality, in-field audio is environmental optimization. Regardless of whether a standing audio booth is used, all events are going to have lots and lots of background noise. So, quality will always suffer if a producer is not aware of their surroundings and able to optimize their setup.
To correct for this with both the standing audio booth and the open-air kit, the in-field producer needed to take some time to familiarize themselves with their environment. Where are loud noises coming from? What distracting background noises exist? And, most importantly, how can I position my microphone to reduce the impact?
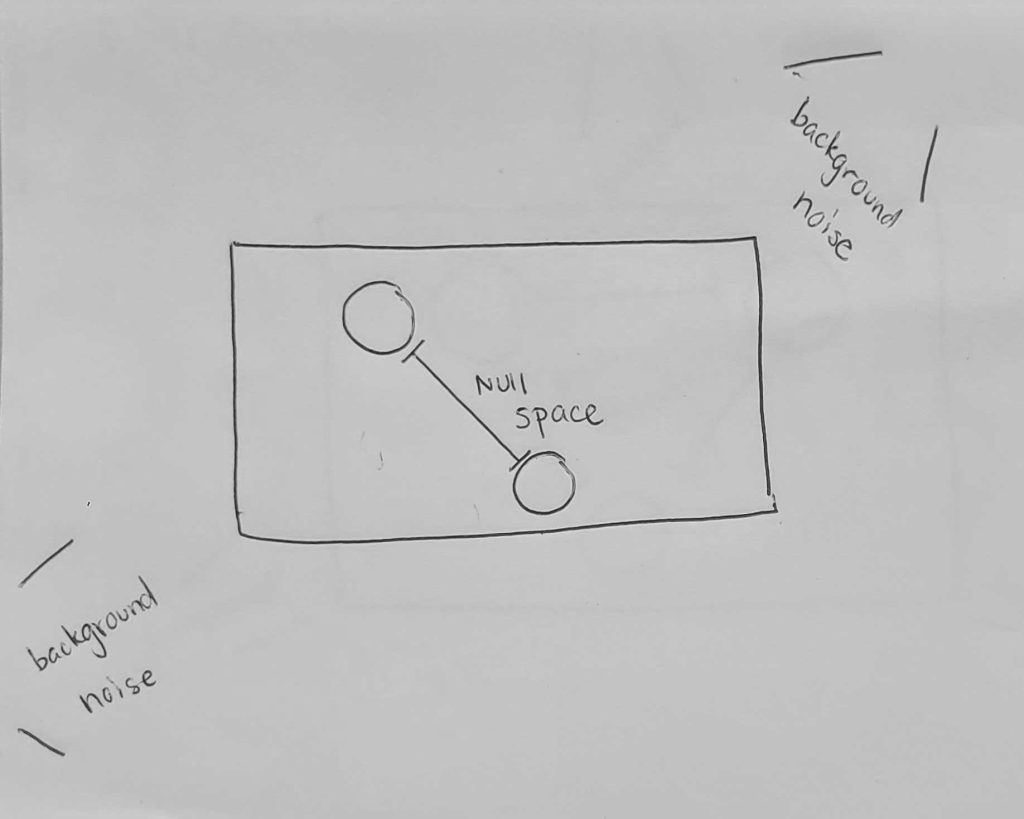
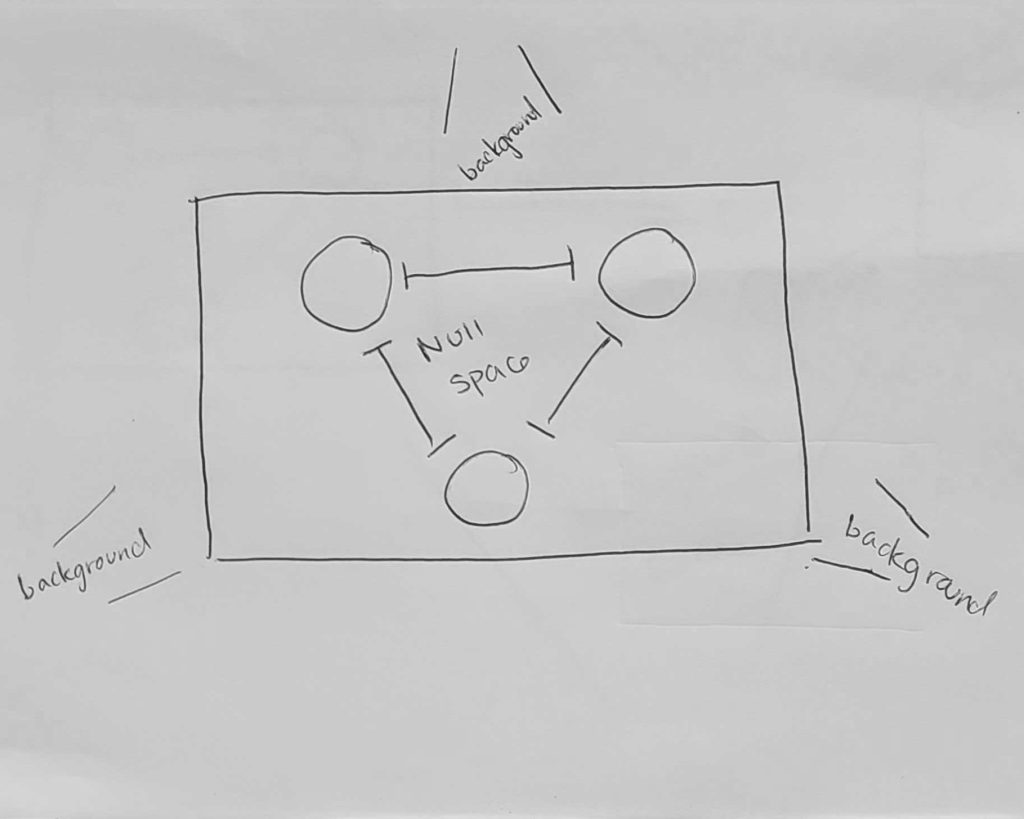
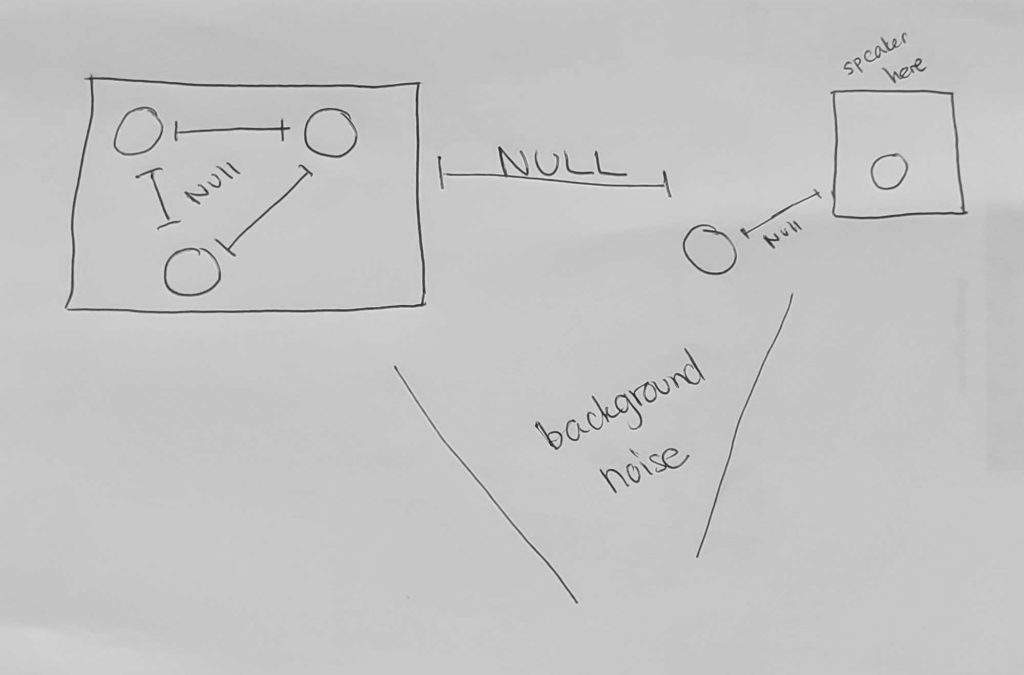
The fact that each booth uses a dual microphone setup — one for the producer and one for the source — does complicate this a little bit. But this can be easily corrected for by using what is called “null spaces” in audio theory. The basic idea is positioning sources so the recording patterns of their mics do not overlap and so that their recording field is positioned to minimize environmental background. Please see my poorly done drawings of a two-microphone setup, a three-microphone setup, and the optimized setup for the current full Missouri on Mic system.
Two mic setup
Three mic setup
Optimized setup
As a note, the most important thing for a conversations-based project is the source’s audio. So, if all else fails, sacrifice the producer’s audio quality, so that a source can be optimized.
Post-production: Editing to streamlining
One of the things we wanted to do for the project was create shared materials that students could refer to at any time, as a way to reduce the editorial and teaching load on the leaders of the project. We ended up breaking this down into several parts: We created videos teaching the basics of Adobe Audition and the basics of conversations-based editing, a lesson on photo basics and skills, and a lesson on how to interview for conversations-based projects.
Here is our four-week schedule
Week One
Audio assigned. Listen to it, clean up the transcript and prepare your “paper edit” — this is just a written version of the content, so that editors have a guide
Week Two
Go over paper edit with your editor. Make any changes, edit your audio, and prepare your first audio edit
Week Three
Go over audio edit with your editor. Make any changes. Finalize your audio and other materials – script, online version, transcript, etc.
Week Four
Turn all materials in. Get new audio assignment and repeat.
When it comes to audio editing conversations-based audio or oral history audio, there are a few things to keep in mind: Have your paper edit ready before you touch any audio, think about how you can make the process the easiest for you, and think about optimizing overall audio quality.
To conduct a paper edit, we ran the original audio files through Otter.ai, and then went back through to correct where the AI failed to translate accent, verbal filler words such as “like” or “um”, background noise, etc.
The prepared paper edit is really the guide that an audio producer should use when they begin cutting audio. This allows them to quickly trim down the audio from its full length. Be sure you are pulling from your transcript that has regular timestamps. We refer to the first set of cuts as “machete level.” These are the large content cuts that bring our audio from 25+ minutes to ideally less than 5 minutes. From there, the editors are making smaller, precision cuts to get their audio to their final 3:00 to 3:15.
When it comes to making the process easier for yourself, there are a couple of things we do:
- We find a space where we can edit out loud (at least for the beginning of the process), as this is more reflective of the listener’s experience and noise reduction edits are a final process step.
- We edit from the back. We make cuts from the end of the audio file so we don’t mess up the timestamps we have identified in our paper edit.
During this process, we think it is very important to have one-on-one edits with your producers. While the pre-created materials do a lot of the heavy lifting, giving producers the time and space to ask questions is important to the project.
One thing we wish we could have done more of was shared group listening and editing. Prior to the final approval of audio pieces, our team gathers in a shared space, listens to the audio together and gives feedback. This is highly valuable and creates a stronger sense of shared responsibility for the project. This fell to the wayside as Missouri on Mic progressed, simply due to the demand of scheduling lots of people.
Basically, as with most things, it just comes down to the fact that no project can be successful in a silo. Whether it is engaging in meaningful conversations, processing the emotional heft of the content, recording high quality audio in the field, answering audio editing questions, or coming up with ideas for good, inclusive events — a project is most successful when many voices with lots of experiences contribute and are empowered to participate.